Tuesday, February 19, 2013

Blueberry Pie

2913B2-133

It seems a bit early here in the Northwest to be making berry pies, but blueberries are showing up at my local grocery stores and I couldn’t help myself. Not only is blueberry pie delicious, it’s healthy (except for the butter, shortening, and whipped cream parts), and blueberries are the easiest berries to bake with. No peeling. No slicing. No seed removal.

21113BP-112

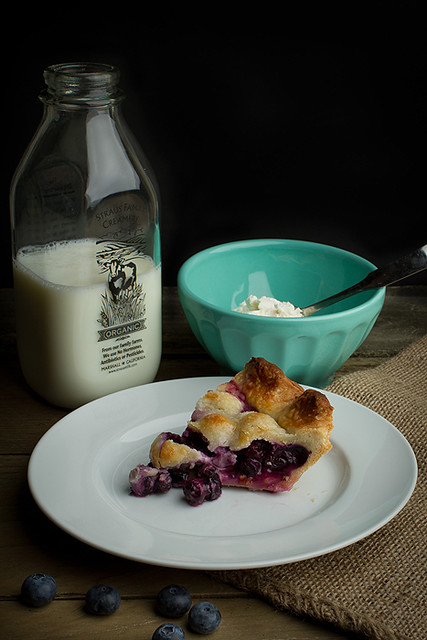
Aside from using fresh, sweet berries, here are a couple tips to creating the perfect blueberry pie: do not over bake it; and keep the berries slightly firm by freezing them first. Don’t completely thaw them before you place them in the pie shell. I don’t mean you should leave them as frozen as the ones shown below. You can thaw them to perfection by running some cold water over them for a minute or two. I prefer that the berries still have a bit of tooth after the pie is baked, but if you don’t, then go ahead and skip the freezing part. See the little nubbly fruit pieces peaking out? Whole berries wrapped in a buttery, flaky crust. That’s the way, uh huh uh huh, I like it, uh huh uh huh.

13113BB-119

My go-to blueberry pie recipe is very uncomplicated, as it should be.


Blueberry Pie
PRINTABLE RECIPE
Freeze 4 cups fresh blueberries overnight. Rinse the frozen berries in a colander by running cold water over them until they are slightly, but not completely, thawed. In a large bowl, mix 1/3 cup all-purpose flour, 3/4 cup granulated sugar, 1 teaspoon cinnamon. Mix well. Pour contents into a 9" prepared crust. Dot with 2 Tablespoons unsalted butter and 1 Tablespoon fresh lemon juice. Place a top crust over the filling, and cut slits in the top of the dough. Crimp the edges together. Brush the top with a beaten egg white and sprinkle with 1 Tablespoon granulated sugar. Place into a preheated 425°F. oven for 35-40 minutes, or until juices begin to bubble through slits. Remove and place on a wire rack until cooled. Serve room temperature with ice cream or a dollop of whipped cream on top.


Thursday, February 14, 2013

Doggie treats

 I made these heart cookies for my 4-legged children. They love them!

21413FP-187

21413FP-189

122512C-265

Here’s how you can make them too...


Yummy Doggie Treats
Melt together: 3 generous Tablespoons bacon grease, 2 generous Tablespoons peanut butter. Add 1 cup cornmeal, 2 cups all-purpose flour, 1 teaspoon of salt, 1 egg, 3/4 cup chicken broth. Mix well until it forms a dough.

Gather dough together and roll out to the thickness you want. Cut out shapes with cookie cutters. Bake at 400°F. for about 18-20 minutes. 


21413FP-209

Happy Valentine’s Day!

Monday, February 4, 2013

Zentangling

This post was written just after Thanksgiving 2012, but I just realized I failed to publish it. I figure the cold, dreary months of winter are here a while longer, so it’s still a good time to share this with you...

The word Zentangle meant nothing to me until a few weeks ago. While visiting my MIL on Thanksgiving (she hosted and cooked a fabulous meal), she shared this new-to-me art form she’s playing around with. I was intrigued. That night I was Zentangling in my dreams. In spite of the fact that the next morning was Black Friday, I knew a search for Zentangling materials was necessary. I found pens and some decent paper at my local art store, got 20% off, and two free t-shirts to boot... I was excited. I’d never participated in Black Friday before.

So what is Zentangling you ask? It’s often referred to as yoga for your brain. It’s a meditation achieved by drawing complicated looking patterns one line at a time. Simple patterns are combined in an unplanned way that grows and changes as you draw. With your mind engaged in drawing, your body can relax. Anxiety and stress melt away. Zentangle, the noun, was created by Rick Roberts and Maria Thomas. You can read more and order materials at their website here.

112612-123

To begin Zentangling, you won’t need much.

Here are the few items I purchased:

Pigma Micron Archival Ink Pens in various sizes: 2-01, 1-03, 1-05 (black)
Prismacolor Brush Tip Marker: size B (black)
Pencils (I had a case full of graphite pencils, but any pencils will do)
Strathmore small sketch pads (fine tooth surface)
Strathmore Bristol (smooth surface)

These materials got my daughter and I started, but pro tanglers recommend working on paper tiles made of 100% cotton, a heavy-weight fine artist’s paper with a beautiful vellum surface finish. My local art store didn’t carry these, so I compromised. The deckled-edge tiles are tempting me now though, and I’ll be ordering some as soon as possible. You can order Zentangle tiles here.

112612-116

112612-108

112612-103

If you do a Google search for Zentangle or Tangling you’ll hit on a multitude of information, how-to’s, patterns, books, etc.

Happy tangling!


Thursday, January 31, 2013

Cauliflower Galettes

Happy New Year! Does anyone make resolutions? I don’t. There is, however, an unspoken need to eat a little healthier after the sugar coma inducing holidays are finally over. 

With dark days and cold nights still looming, the need for comfort food is prevalent. As I try to navigate away from the old meatloaf, mashed potatoes, pot roast standbys, I’m slowly gathering meatless meals for my vegetarian daughter. Every once in a while I run across one that I just have to tell you about.

122512C-126

I met up with my friend Theresa at a local French restaurant for a birthday lunch a few months ago. Coincidentally, we were both wearing our favorite cowboy boots. It was very appropriate that she gifted me with this book... Cowgirl Chef, Texas Cooking with a French Accent by Ellise Pierce. As a Texas native who now lives in Paris, Ellise shares her cooking trials and tribulations throughout the book. Her recipes come with a story about living in Paris, things she loves or misses about her home state, or funny observations about the two cultures. I also just learned that she has a blog! You can find that here.  

Cauliflower! That’s a vegetable that doesn’t find its way into my grocery basket very often! It includes cheese, so I knew it wouldn’t be too difficult to get my daughter to at least give it a try. 


Cauliflower Galettes with Chipotle Creme Fraiche
Makes about a dozen 2 1/2 inch galettes

1 medium head of cauliflower, cut into florets
Olive oil
Sea salt and black pepper
1 cup cornmeal
2 teaspoons baking powder
1 teaspoon sea salt
1/2 teaspoon cayenne pepper
1/2 teaspoon cumin
2 eggs
1 (5.29 oz) container Greek yogurt
1 cup water
4 green onions, sliced
1 cup cheddar cheese, grated
4 tablespoons vegetable oil

1. Preheat your broiler and line a cookie sheet with foil. Position a rack in the middle of the oven.

2. Toss the cauliflower florets on the foil-lined cookie sheet, add a little olive oil, and salt and pepper. Toss it all together with your hands, then slide the pan into the oven. The florets will begin to brown after about 10 minutes—when they do, pull them out of the oven and turn them over, so the other side browns too. This will take about 10 more minutes. When they’re browned on both sides, remove from the oven and let cool

3. To make the galettes, in a medium bowl, whisk together the cornmeal, baking powder, sea salt, cayenne pepper, and cumin.

4. In a separate bowl, whisk together the eggs, yogurt, and water. Add this mixture to the dry ingredients and stir together. If the batter is too thick, just add a bit more water. Gently fold in the cauliflower florets, grated cheddar, and green onions, reserving about 2 tablespoons of green onions for garnish.

5. Heat 2 tablespoons of the vegetable oil in a skillet and turn the heat to medium-low. When it’s hot, spoon about 2 tablespoons of the batter for each galette into the skillet, fitting in as many as you can. You’ll need to work in batches. Cook the galettes for 3-4 minutes, or until the bottoms are brown, and flip to the other side for another few minutes. You don’t want these to cook too fast, or they’ll be wet in the middle. Repeat with the remaining vegetable oil and batter. Serve with Chipotle Creme Fraiche, and sprinkle some chopped onions on top.


Chipotle Creme Fraiche
Makes about 2 cups

16 ounces creme fraiche or sour cream
1-2 canned chipotle chiles in adobo sauce (you can add more if you like things extra spicy)

Toss your chipotles into a food processor to finely chop them up, or you can do this by hand. Add the creme fraiche or sour cream and stir it up.

Enjoy!


Wednesday, December 26, 2012

Making mud pie

I hope you all had a fabulous Christmas! I’m enjoying a stay-cation this week, catching up on sleep and attempting to do my part in eliminating the sugary treats that have taken up residence in our house over the holiday.

This chocolate pie recipe has been sitting in my recipe book for a couple years now, and I’ve been looking for a reason to make it. With texture that’s a cross between a chocolate-bottomed pie and a moist chocolate cake, Mississippi Mud Pie starts with a chocolate pastry dough. The filling includes whipped egg whites and chocolate that bakes to a thin crispy top layer with a moist cake-like center. It may not be the most beautiful looking pie on the planet, but it is appropriately named for its textural similarity to the rich, gooey mud found along one of America’s greatest rivers. And, it tastes way better than any mud pie I’ve ever made!

122512C-215

122612MMP-124

122612MMP-127

Mississippi Mud Pie


Dough
1 Cup unbleached all-purpose flour
2 Tablespoons sugar
2 Tablespoons unsweetened cocoa
1/4 Teaspoon salt
2 1/2 Tablespoons vegetable shortening
2 Tablespoons chilled unsalted butter, cut into small pieces
1/4 Cup ice water

Filling
3 Tablespoons butter
1/3 Cup semisweet chocolate chips
1 Teaspoon vanilla
4 large egg whites
1 Cup sugar
3/4 Cup unbleached all-purpose flour
1/3 Cup Dutch process cocoa
1/2 Teaspoon baking powder
Dash of salt

Directions
To prepare the crust, combine 1 cup flour, 2 tablespoons sugar, 2 tablespoons unsweetened cocoa, and 1/4 teaspoon salt in a food processor; pulse 2 times or until blended. Add shortening and chilled butter; pulse 6 more time or until mixture resembles coarse meal. With the processor on, slowly pour ice water through the food chute, processing just until blended (don’t allow the dough to form a ball); remove from bowl. Gently press mixture into a 4-inch circle; warp in plastic wrap and chill for about 30 minutes.

Preheat oven to 350°F.

Unwrap and place chilled dough on a floured surface. Roll into a 10-inch circle and press into a 9-inch pie plate. Fold edges over and flute.

To prepare the filling, place 3 tablespoons butter and chocolate in a microwave safe bowl. Microwave on high for 30 seconds or until butter and chocolate melt. Stir to combine. Place vanilla and egg whites in the bowl of a mixer and beat at medium speed until foamy. Gradually add 1 cup sugar; beat until soft peaks form, about 2 minutes. Gently fold in melted chocolate and butter mixture.

Combine 3/4 cup flour, 1/3 cup Dutch process cocoa, 1/2 teaspoon baking powder, and a dash of salt in a small bowl. Fold flour mixture into egg white mixture. Pour filling into the prepared crust. Bake at 350°F. for 40 minutes. Cool on a wire rack.


Friday, December 14, 2012

Pecan Tassies

What’s a tassie? It’s a small tart. These tiny tarts are created with a golden, flaky cream cheese pastry that cradles sweet, gooey pecan filling. They are mini pecan pies you can eat in one to three fabulous bites!

I like these tasty treats because they are the perfect desserts for eating with your fingers, and you can make them ahead and pop them in the freezer before the holidays... what’s not to like?

122311CC-145

Pecan Tassies

Pastry
Cream together and chill for 2 hours or overnight: 
8 oz. regular cream cheese
1 Cup unsalted butter
2 Cups unbleached all-purpose flour
Form chilled dough into walnut sized balls and press into lightly buttered mini muffin tins.

Filling
2 eggs
1 1/2 Cups brown sugar
1/8 Teaspoon salt
1/4 Teaspoon vanilla
2 Tablespoons melted butter
1 Tablespoon pure maple syrup
1 Cup chopped pecans
Beat eggs well. Add remaining ingredients. Fill pastry lined pans and bake at 350°F. for about 12-15 minutes. Remove tassies and let them cool on a wire rack. If you don’t plan to serve them within the next day or two, pop them into freezer-safe containers and freeze while they’re fresh. 

Makes about 4 dozen tassies

122311CC-157

122311CC-146


Thursday, December 6, 2012

Holiday Cookies

Gather your butter! It’s time to make cookies. First up... butter cookies. I like to make the decorated cut-out, butter cookies first. They can be sealed in airtight containers and wait patiently in the freezer for weeks before the holidays, then thawed and decorated days before they’re eaten.

122311CC-172

I love this recipe, cause it’s versatile. You can add a little flavoring, put the dough through a cookie press, or give it a different shape, and voila! A new cookie is born from the same dough!

123010C-5

81011SB-107

Get creative when decorating. I like to cover the cookies with a layer of frosting, let it set for several hours, pipe on a design and sprinkle with sanding sugar. That way the sugar sparkles stick to the piped on frosting and your design really stands out.

122311CC-156


Butter Cookie Dough
This recipe makes about 4 dozen cookies
Two dozen snowflakes, two dozen spritz


2 Cups (4 sticks) unsalted butter, softened to room temperature
2 Cups sugar
2 Large eggs
2 Tablespoons vanilla
2 Teaspoons salt 
5 Cups all-purpose flour

Cream the butter and sugar on high speed in the bowl of an electric mixer, or with a hand mixer for about 5 minutes, or until the mixture is light and fluffy. Add eggs, vanilla and salt. Mix on medium speed until they’re combined. With the mixer on low speed, add flour in two batches, and mix until it’s mixed well. Divide the dough into two equal portions. Place each section on a piece of plastic wrap and refrigerate until firm, at least 2 hours or up to a week.

When you are ready to bake:
Snowflakes - Preheat oven to 350°. Roll out one or two disks of dough to about 1/8 inch thick. Using your choice of snowflake cookie cutter (I like the 3-inch one), cut out shapes and place 2 inches apart on baking sheets. Gather scraps together, and continue to roll out more cookies. Chill for about 10-15 minutes. Bake cookies for about 8-10 minutes, until they are golden brown around the edges. Let cool on baking sheets for a minute before transferring to a wire rack to cool completely. You can then store them in airtight containers at room temperature for up to 5 days, or in the freezer for several months.

Spritz - Preheat oven to 350°. To the basic sugar dough add a Tablespoon of orange zest. Transfer dough to a cookie press and pipe shapes onto greased baking sheets, about 1 inch apart. Sprinkle with sanding sugar(s). Chill for about 10-15 minutes. Bake 8-10 minutes, or until edges are light brown.

Icing
These recipes make enough to frost two dozen cookies, or half of the above recipe. (Remember, you’re going to sprinkle the Spritz cookies with Sanding sugar)

PRINTABLE RECIPE

For spreading:
In a bowl, stir until smooth:
3 Cups powdered sugar
1 Teaspoon vanilla
1/4 Cup water
To tint, stir in food coloring, a teeny tiny bit at a time. A little goes a long way.

For piping:
2 cups powdered sugar
1/2 Teaspoon vanilla
1 1/2 Tablespoons water
Tint with a little food coloring. The icing needs to be stiff enough to hold a line when piped through a pastry bag fitted with an 1/8-inch tip. If it’s too thick, add a little water; if it’s too thin, add a little powdered sugar.