Wednesday, December 28, 2011

how i spent my Christmas vacation

122311CC-172


I made eight... count them... eight varieties of cookies in the last few weeks... that’s over 400 cookies.


122311CC-171

122311CC-145

122311CC-144

I didn’t have a chance to photograph the spritz, chocolate, shortbread and gingersnaps before they disappeared.

The day after Christmas, I had an epiphany.

As much as I enjoy sharing homemade gifts with my family and friends, I spent way too much time in the kitchen in the last few weeks, and not enough time enjoying some time off. I was busy with work in the weeks leading up to Christmas, so after a day of working, I made dinner for my family, drove my daughter to and from her dance class, prodded her to make sure all her homework was done, and then baked cookies all night. At a time of year when we all eat too much sugar, gifts of sweets seemed less than appreciated by many.

I’m disenchanted with the whole Christmas gift exchange hoopla. Can’t we just enjoy the season without going broke, and more time enjoying and less time doing? There are so many holiday events I miss every year because I’m too busy putting together gifts, food, wrapping, cleaning, etc.

Tell me... how do you do it all? What parts of Christmas do you truly enjoy?

Tuesday, December 13, 2011

mini paper bag scrapbooks

121211CH-166

Do you have young kids? Are you a grandparent of young-uns? Looking for handmade gift ideas? Read on...

I have never been a scrapbooker. Photos from the first five years of my daughter’s life were placed into several of those ready-made photo albums. I also have another nine years of photos stashed away in boxes and many digital back-up devices filled with images. I even have one of those great PictureMate personal photo printers that spits out great 4x6 prints perfect for scrapbooking.

When my daughter was younger, I was always looking for gifts she could give to her grandparents, and this idea jumped out at me. It was a perfect project for us to create together.

They were a huge hit! There were even tears of joy from the recipients.

Supplies you’ll need:

(If you have a Michael’s craft store in your area, you can find most of the items there)

• Several smallish colored paper bags (10"x 5.5")

• Several sheets of felt

• Photos

• Sheets of fun patterned paper

• Scrapbook type embellishments

• Ribbons

• Scissors

• Glue

121211CH-159

Directions: Grab four paper bags in various colors (or all the same color if you prefer) and cut the open ends using some fancy shaping scissors.

Fold the bags in half and line up at folds. Glue each open end to a closed end. Glue a long piece of ribbon (about twice as long as the bags or approximately 21") to the entire length of the outside and cover both sides with a sheet of felt. Cut the edges so they overhang slightly to cover the edged of the bags.

Now for the best part. Create scrapbook pages using photos that capture great memories you and your kids have shared with the recipient of this awesome gift.

121211CH-158


We share beach traditions with both Grandmothers. Each Mother’s Day, Isabel and I spend a long weekend with my Mom at the Oregon coast. Each Thanksgiving our family spends a weekend with my Mother-in-law and my husband’s extended family at the beach. Needless to say, both of the books we created were beach themed.

121211CH-156


I like to cut out images and paste them over a background. I just like the look it creates.

121211CH-154


Make sure you fill the pockets of the bags with fun photos or notes too. We added little felt and paper shapes to the edges of the photos so they could slide in the out of the pockets easily.

121211CH-173


121211CH-165


121211CH-155


Have fun!

Friday, December 9, 2011

putting the merry in Christmas

Every year the stress arrives, and every year I retaliate in hopes of keeping my sanity. My husband claims that Christmas has become a women’s holiday. There’s more truth in this statement than I’d like to admit. More often than not it seems to be women who carry out the holiday tasks. We arrange gatherings with family and friends, decorate, bake, shop, exhaust ourselves all in hopes of creating the “perfect” holiday.

cutting down the tree
One of my husband’s holiday tasks is cutting down the Christmas tree for our living room. We pile into the SUV armed with a saw and a thermos full of hot chocolate.

I say this every year... I really need to step back and look at what’s most important. In doing this, I came up with a short list.

Quality over quantity. Less is more. Spending time with family and making memories is more important than spending money on gifts.

Stick with a few simple traditions you’ve already established. Don’t try to create new ones. This can lead to more and more obligations that you won’t be able to keep up with. Don’t give up the traditions you enjoy to make room for other people’s traditions.

Make lists. This could keep you from losing more sleep at night with extra details running through your head, which in turn will make you even more sleep deprived and irritable.

Shop online. If you do need to buy gifts, avoid crowded malls. Make shopping a more pleasant experience. Shop online in your p.j.’s with a cup of hot cocoa.

Don’t go into debt. Pay only cash for any gifts you buy. If you don’t have the cash to buy, don’t buy. There’s nothing worse than having bills arrive in January to start the new year off wrong.

Expectations. If you have them, lower them. Don’t expect that everyone at family gatherings will get along or chip in and help, or even show up for that matter.

Humor. Keep it intact!

tree


Christmas is stressful, but for the most part, it’s self-imposed stress.

Here’s a little holiday humor... (an excerpt from an old Home Improvement episode)

Brad: (Brad wants to go skiing on Christmas Eve) But Mom, it’s perfect. I mean, I don’t have school and I can take your presents with me and open them there.

Jill: The family is always together on Christmas. We hang our stockings together. We talk to relatives on the phone. You have your new saxophone so you can play along while we sing carols and I’m going to make Nana’s special oyster pecan stuffing.

Brad: All I wanted to do was be with my friends. A lot of people I like are going to be down there.

Tim: Christmas is not about being with people you like. It’s about being with your family.

Ouch!

Merry Christmas!

Wednesday, December 7, 2011

mini tin purses

When my daughter was about nine or ten she loved Altoid mints. This idea for purses made from the tins were a perfect project for her. She found instructions for these tiny tin purses in her American Girl Magazine and was smitten with them.

These take me back to the days when my daughter had a short(er) attention span. Back to a time before a good book, an iPod, YouTube, or GoogleMaps, kept her engaged. Crafts that could be created in an hour or two, at the most, were ideal. We created these on a quiet vacation many summers ago.

To create your own little tin purses, you will need: Altoid mint tins, ribbon, felt, fabrics, pom poms, buttons, small flat round magnets, hot glue and a glue gun

12211TIN-105


Cut pieces of felt to fit both sides of the tin. Working with the tin open, and making sure you don’t cover hinges, first glue the ribbon you’d like to use as a fastener, then glue the felt on one side only into place over that. You can add a magnet and a button to the ribbon so that it looks like an important fastener on the front of the purse. Add ribbon around the edges. To make a handle, cut a ribbon several inches longer than the tin is around and glue it to three sides of the tin leaving the extra ribbon at the top. Embellish with whatever floats your boat... pom poms, fabrics, buttons, etc.

12211TIN-119


12211TIN-121


12211TIN-122


I’m sure you can be much more creative and precise than we were, especially if you have kids with longer attention spans.

These would make great gifts. It could be a sewing kit (fill it with thread, needles, safety pins, scissors). Or a survival kit (fill it with waterproof matches, a little flashlight, fishing line, water purification tablets). You could put an iPod in it. Turn the inside into a mini scrapbook. The ideas are endless.

Be creative. Have fun!

Thursday, December 1, 2011

live in the moment... breathe

YIKES! IT’S DECEMBER!!!

This season is really what we choose to make it isn’t it? If you like crowds and franticness, it’s just outside the door. If you’d rather avoid the chaos, you can shop online and wait for things to come to you.

If you’re looking for gift ideas for your wife, girlfriend, mistress, mother, daughter, here are a few...

iPad case in one of my favorite colors. Available at Ceccec $189

Perfect iPad holder for use in the kitchen with a little stylus so you don’t have to touch the screen with your goopy fingers.
Available at Belkin $39.99


If you’ve never felt or worn liquid metal, you must. I have this bracelet, and it’s so comfortable and gorgeous. I get compliments on it every time I wear it. Sergio Gutierrez has several designs of liquid metal bracelets.
Available at G Squared Gallery $65 and up depending on size and width.
Sergio also designs necklaces.
Michael Kors 'Bedford' $348 Available at Nordstrom 

If you like hanging out at home, creating things, and not spend spend spending, there are plenty of ideas for homemade gifts. Things made while sharing quality time with friends and family can be the best.

During the next few weeks, I’ll be sharing some of the homemade gifts I’ve made in the past, and some holiday treat ideas too. But, you’ll have to wait until after Christmas to see what gifts we’re making this year.

I do have some specific goals for this holiday season: 1. Live in the moment; 2. Stay sane

No pressure, but what do you have planned?

Sunday, November 27, 2011

tart and more tart

I hope you all had an enjoyable Thanksgiving filled with good food and family and/or friends. Dinner for us on Thursday was hosted by my brother and sister-in-law, so the only thing I had to do was make dessert. I decided to keep it light and simple with a French apple tart. I realized as I prepared to lay down the apple slices in a circle, that I had no idea how to do this. Do I start in the center and work my way out, or start at the edges and work my way in? I learned three things: 1. I need to create a step-by-step on this simple task; 2. It’s not as fussy as it looks; 3. When you put apples, cinnamon and sugar together and bake them, your house smells wonderful all morning.

Sometimes it’s good to mix things up, break from the traditional pumpkin pie. This seemed perfectly light, almost healthy after a heavy meal.

112511T-168

I placed the apple slices along the edge of the crust and worked my way toward the center, overlapping as I went. Then went back and filled in any spaces.

Michael returned from three weeks in Africa. I welcomed him home with a dinner of chicken enchiladas and this super easy, slightly tart, moderately sweet, lemon tart...

112511LT2-106

Attention lemon lovers: you can include two full lemons. 
I stopped at one and a half, and it was plenty lemony for me. 


Lemon Tart
Printable Recipe


Adapted from a recipe by Susan Branch

Preheat oven to 350°F.
Butter a 9x14” tart pan (or you can cut the recipe in half and use an 8” square).

Crust:
1 cup (2 sticks) unsalted butter, softened
2 cups unbleached flour
1/2 cup powdered sugar
1/2 teaspoon lemon extract
2 pinches of salt

Place all ingredients into a food processor and mix until soft and smooth. Please evenly into the tart pan and bake for 20 minutes.

While the crust is baking, make the topping.

Topping:
2 cups sugar
1/2 teaspoon lemon extract
4 eggs
Juice and zest of 1−2 lemons
1/2 cup unbleached flour
1 teaspoon baking powder
powdered sugar for dusting the top

In a kitchen mixer, beat eggs well. Gradually add sugar and mix until mixture is thick. Add all other ingredients (except the powdered sugar). Beat. Pour this mixture over the baked crust and return it to the oven. Reduce heat to 325°F. Bake 30-35 minutes until it turns golden. Cool and remove from tart pan. Sift powdered sugar over the entire tart. Cut into squares.

Saturday, November 19, 2011

what I’m thankful for... part 4

Yoga

“When I am anxious, it is because I am living in the future.
When I am depressed, it is because I am living in the past.
When I am peaceful, it is because I am living in the present.”

Yoga is about living in the present... occupying your body, stretching beyond what you thought were your limits, and erasing all stress for a short period of time. Yoga has the ability to ward off injuries from other more strenuous workouts, and give you the strength necessary to push your body even further.

I have not always believed this. For years I was a yoga skeptic. I went to a chiropractor, my GP, a psychologist, a massage therapist. Every one of them (with the exception of my GP, who gave me a prescription for anti-anxiety meds) recommended yoga to me as a way to strengthen the muscles that hold up my head and reduce the anxiety I was experiencing. I was running four days a week and lifting weights every other day. My neck and shoulders hurt more and more with each workout. Some days my neck hurt so badly that the pain made me sick to my stomach and dizzy. I was convinced that I must have some major nerve issue going on. The more it hurt, the more tense I became, which in turn created tighter muscles and more anxiety.

In hopes of breaking the vicious cycle, I heeded the advice of many and joined a yoga class. People were standing in the tree pose for several minutes. Just standing there on one leg! “You are a strong tree, gently swaying in the wind,” the instructor spoke quietly. I carefully placed my right leg onto my left. My right foot slipped right off my left leg and landed back on the floor. I was not just swaying, I was a fallen tree.

It all began to change the day I met an amazing instructor, Jim Gillen. Jim has an approach to yoga that I had never experienced before. He jokes during class, his voice and manner calm me. He corrects poses. After several months of classes with him, I realized that with his corrections, and a steady, focused gaze, I too was becoming a stable tree. I swayed slightly, but didn’t topple over.

I have been doing yoga regularly for the last year. I love it, crave it, it’s limbering me up and strengthening my body more than any other exercise ever has. Muscles made sore from running and weight lifting are stretched and soothed in yoga. My core strength, balance and anxiety have improved immensely.

According to a study done by The Wall Street Journal, yoga does not have mental effects. I am convinced that their study was not conducted for long enough to reveal those mental benefits. If something healthy can reduce my anxiety levels, I’m sticking with it.

Being fit is not a destination, it’s a way of life.

This is my new favorite pose.


and then there’s the cute clothes factor...

No more baggy Guatemalan prints from the 70’s are seen in yoga classes today. Yoga clothes have become so cute you’ll wanna wear them all the time. Since discovering Lucy (we have several stores nearby), I could be perfectly content living in workout wear. The compression of their pants gives the feeling of weightlessness. When I put their clothes on, I feel as fit as an olympic athlete. Throw on one of their awesome jackets, and voilá! They had a sale last Saturday, a birthday celebration with 25% everything in the store. I stocked up on a few necessities.

Namasté.

Tuesday, November 15, 2011

what I’m thankful for... part 3

My husband

While my daughter and I are here with all the comforts of home, hubby is in Bulawayo, Zimbabwe at the Chipangali Wildlife Orphanage and Matobo Hills National Park. He’s working with one of the Oregon Zoo’s curators on a biodiversity and leopard study of Matobo Hills. He’s reported that working conditions are not ideal. Daytime temperatures sore into the 100’s, and dip into the 90’s at night. While staying at the orphanage, he’s not able to open the windows in his room... well, he can, but he’ll have to share his space and belongings with monkeys and cute lil’ lion cubs.

GOPR0211
Michael living one of his boyhood fantasies... driving a Land Rover through Africa looking for photo opportunities.

Most of his time is spent out in the back country of the Matobo Hills. I guess they’re camping while in the park, but to tell you the truth, I don’t want to hear the details of that until he returns.

In case you don’t know what my husband does for a living... he’s a hotshot natural history photographer. His devotion to his work, and the extent he goes to achieve outstanding results, continue to amaze me every day. His work is so specialized that he is forced to develop and create equipment to suit his needs. With the tight airline security in force, you can imagine the delays he encounters when traveling internationally. During security checks, he’s questioned, sometimes interrogated and delayed while he explains mysterious photo equipment to personnel. With language barriers, the stress level is high. When I traveled to Ecuador and The Galapagos with him last year, I witnessed a bit of that stress first hand.

While he’s traveling in Africa, we’ve had a few conversations using FaceTime on our smart iPhones and iPads, but because power and internet is inconsistent, we have to go for days or weeks without communication. He tells me that being out of contact with us is his greatest source of anxiety.

I look forward to the day when I’m able to travel with him more frequently.

_MG_2280

_MG_2475
These are some of the orphaned lions living in the care of the Chipengali orphanage. 
Chipengali means “open friendly country.”


I just received more information about this larger lion cub: 

“The larger lion cub is 18 months old. This is a bit old (and large) to be roaming with people, but she was so malnourished when she was young that she needed constant care and love and had to fight to live. She is playful but remarkably gentle. Still it is a bit frightening to see her rush over to play since she can knock a person over. She is good with the dogs and small animals. We eat outside and this lion will not try to take food or steal food from the dogs. It’s just weird to have such a large alpha predator with such a mellow disposition.”


I love you sweetie! Stay safe!


Sunday, November 13, 2011

what I’m thankful for... part 2

Friends and fresh food

111211CSA-110-Edit

All this was in this week’s CSA (Community Supported Agriculture) gift. It includes: comice pears, liberty apples, chanterelle mushrooms, cremini mushrooms, leeks, spinach, celeriac, delicata squash, purple carrots, kale, onions, fennel, eggs, cheese and a loaf of bread. A lot of farm fresh deliciousness in this box!

I love it when friends aren’t able to use their CSA box and they gift it to me! Thank you Chris!!

A big part of the excitement in having all these fresh ingredients in my kitchen is figuring out what to cook... and photographing it, of course.

111211CSA-140

Chanterelle mushroom. Mushroom risotto?

111211CSA-129

Purple carrots. Will be great in squash soup. Along with delicata squash, apples and onions.

Do you know what this is?...

111211CSA-134

If you answered celeriac (aka celery root), you’re correct! There are several recipes online that use celeriac including: celeriac soup; mashed potatoes with celeriac; slaws, and remoulade. Good to know that it’ll keep, wrapped loosely in the produce drawer of the fridge for up to two weeks.

Comice pears. Not sure what I’ll do with these yet. Maybe just bite into them. Or bake them into individual tarts and serve them warm with ice cream. They are beautiful aren’t they?

111211CSA-126_Edit

It looks like I’ll be occupying my kitchen for a while.

Happy Sunday!

Wednesday, November 9, 2011

what I’m thankful for... part 1

My daughter

71811IS-113R

While my husband is off in Zimbabwe for the month of November photographing leopards, bats, and other creatures that go bump in the night, my daughter and I are home doing girly things (along with going to school, dance, work and household chores... but let’s forget that part for now). We are really enjoying our mommy/daughter time together.

Last weekend Isabel set up a spa in our living room. She made us warm foot baths with oils, lavender, sea salts and/or oatmeal. While we soaked our feet, we watched reruns on Hulu+ like Rhoda, Mary Tyler Moore, Cake Boss. Then she lathered on lotion and gave me a relaxing foot massage.

She also provides facials created with natural ingredients such as egg, coconut milk, lemon juice, oatmeal, yogurt. Taking into consideration the dryness or oiliness of our skin, she carefully prepares a personalized formula. Often a shoulder massage is involved. We trade off being the masseuse. She calls this a massage train. We feast on seafood and eat ice cream. That’s it! She is forbidden to grow up and leave!

Tuesday, November 1, 2011

French Apple Tart

11111-127


Gravenstein apples had been chillin’ out in our spare refrigerator for several weeks before I finally found time to bake something with them. An apple pie seemed like too much dessert during these days while my husband is doing a slow-carb diet. That means that every day of the week but one, he avoids sweets and carbs. Saturdays are his designated “eat whatever I damn well please” day. So unless I want to make a total pig out of myself, I bake on Saturdays. Then I have the rest of the week to enjoy the leftovers.

This French apple tart recipe was exactly the type of dessert deserving of the slightly tart, crisp apples I’d scored on a recent local farm excursion. Simple. Light. Not too sweet. Goes down easy after a large meal and even better mid morning with hot coffee.


TartPrep
Working with dough is very satisfying!


103011AP-189


I just learned about glazes. They can magically make pastry look professional.


French Apple Tart
(a slightly modified version of Ina Garten’s recipe)
Serves 6

PRINTABLE RECIPE

Pastry

2 cups all-purpose flour
1/2 teaspoon kosher salt
1 Tablespoon sugar
1 1/2 sticks cold unsalted butter, diced
1/2 cup ice water

Place the flour, salt and sugar in the bowl of a food processor fitted with the steel blade. Pulse for a few seconds. Add the butter and pulse 10-12 times, until the butter is in small pits the size of peas. With the motor running, pour the ice water into the feed tube and pulse just until the dough starts to hold together. Dump onto a floured board and knead quickly into a ball. Wrap in plastic and refrigerate for at least one hour.

Preheat the oven to 400 degrees. At this point you can either: grab a sheet pan and line it with parchment paper or a Silpat mat; or, as I did, a rectangular (10x15) tart pan with a removable bottom. I think this gave the tart a fancier, company worthy presentation.

Roll the dough out slightly larger than 10x14 inches. If you’re using a sheet pan, you’ll want to use a ruler and knife and trim the edges. Place the dough on/in the pan of your choice and refrigerate while you prepare the apples.

Apple filling

4 apples (you can use Granny Smith, Gravenstein, or any other semi-tart apples)
1/2 cup sugar
1 teaspoon ground cinnamon
4 Tablespoons cold, unsalted butter, diced small

Peel the apples the cut them in half through the stem. Remove the stems and cores with a sharp knife and a melon baller. Slice the apples crosswise in 1/4-inch-thick slices. At this point, apple slice placement depends on the pan you’re using. I created three rows of apples, but you could place them diagonally, or spiral them if you want to make it real purty. Sprinkle the apples with 1/2 cup of sugar, 1 teaspoon cinnamon and dot with 4 Tablespoons of butter.

Bake for 45 minutes to one hour, or until pastry is browned and the edges of the apples start to brown.

Glaze

1/4 cup apricot jelly or jam
2 Tablespoons apple brandy, rum or water

Heat the jelly or jam along with the liquid. If you used jam, you’ll need to sieve it through cheesecloth. Brush apples and pastry completely with the mixture.

Allow to cool and serve warm with a little whipped cream or ice cream.

11111AT-103


Saturday, October 29, 2011

procrastinating...

_MG_7556

_MG_8063

Remember my knitting frenzy a few years ago? If not, you can read about it here. And here. Hats, specifically, were planted on the heads of friends and family members, whether they wanted them there or not. My mother-in-law requested a hat. Great! I'd love to knit one for you! I chose this beautiful green wool yarn. She chose the style. Knit. Knit. Knit. Stop. An entire year passes. Knit. Knit. Stop. Another entire year passes. The unfinished hat is still on circular needles.

Today I finally took it off the needles to check for size. It looks a bit large, but we’ll see...

Do you have any projects that you’ve been putting off? Why are you procrastinating?

Thursday, October 20, 2011

Portland composts! and fruit flies!!

If you live in the city of Portland, you are well aware of the new “curbside-composting pilot program,” which will soon expand to all single-family homes. If you don’t live in the beautiful city of roses, stick with me anyway, this composting is just a segue into the meat of this post. 


Beginning October 31, we will toss all unwanted foods, i.e. coffee grounds, bones, rotten veggies, meat, and even old pizza boxes, into the green carts we now use for yard waste. The city is providing us with these little kitchen pails to collect scraps in the kitchen that then will be emptied into the yard debris cart.


I picked up this compost pail that is aesthetically more appealing. It can be found at Williams-Sonoma for $29.95. For something I have to look at every day sitting on the kitchen counter, I find it much more pleasing, but that’s just how I roll.


In preparation for this new program, here at chez Portland Peeps we started a little early. We were already pretty good at doing our own composting by giving any leftover veggies to our chickens, so this really isn’t that much of a stretch. I’m all for composting and think everyone should do it anyway. I know the city is trying to cut costs, so I wish them luck with that.


Now we have these...


Spotted wing fruit fly (Drosophila suzukii)


Spotted wing fruit fly (Drosophila suzukii)


In case you don’t recognize them, these are fruit flies. Drosophila suzukii. My talented husband photographed them. It’s hard to believe they have all this going on, when in reality they’re the tiniest things with wings ever. He makes them look like something from Empire of the Ants. Huge creatures I would never be able to smack between my hands to kill. 


So does anyone know how in the world to get rid of these little pests? 


Here’s what I’ve tried so far:


Bleach - poured 1/4 cup down the drains for several days in a row. I heard they breed in there.


Fruit - put all fruit into the refrigerator and closed the door tight. They breed in there too. Duh! Why else would they be called fruit flies?


Cleaned - washed all counter surfaces with a mixture of bleach and water.


Still the buggers are flying around my kitchen! Excuse the pun, but they are really bugging me!


Any and all ideas for eliminating them will be greatly appreciated.


Thank you!


Monday, October 17, 2011

dark chocolate almond butter

101511AB-199


“Robin eats chocolate sandwiches,” my daughter announced after a day in 3rd grade.

“That poor girl!” I thought. Most likely she’s left to make her own lunches and this is what she chooses? A chocolate sandwich? Can you imagine? Is it on white bread?

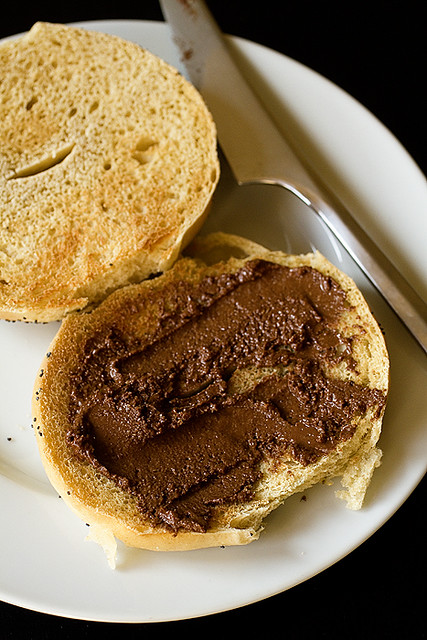
Fast forward to a recent shopping trip. My daughter spotted the chocolate in a jar, or Nutella. It occurred to me that this was most likely what had been slathered on Robin’s sandwiches. Somehow a jar made its way into my basket. I caved. Isabel is hooked. Her breakfast of choice is now a bagel topped with Nutella.

After reading the list of ingredients, I channeled Jamie Oliver, and thought, “I can make this healthier.”

Nutella’s ingredients: sugar, palm oil, hazelnuts, cocoa, skim milk, reduced minerals whey (milk), lecithin as emulsifier (soy), vanillin: an artificial flavor.

Searching through the internet, I found several recipes similar to Nutella, commonly using hazelnuts and chocolate. I decided to combine some of the ingredients and create my own. This was partially determined by what I already had in my kitchen.

Measure about two cups of almonds or hazelnuts and put them in a single layer onto a cookie sheet.

101511AB-135


Roast the nuts in a 350 degree oven for about 10-15 minutes, stirring often so they don’t burn. Place them into your food processor.

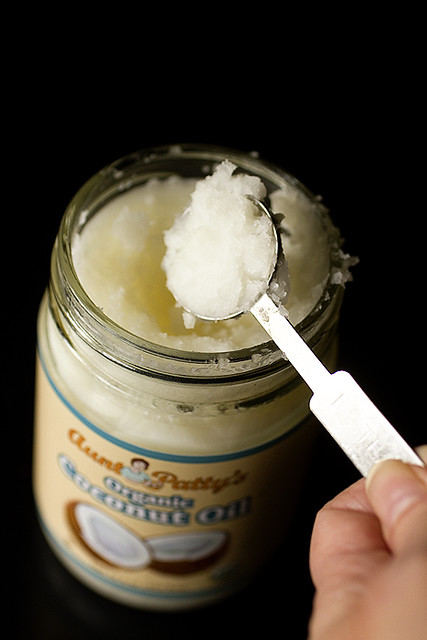
Add 1 teaspoon of coconut oil to the warm nuts.

101511AB-142


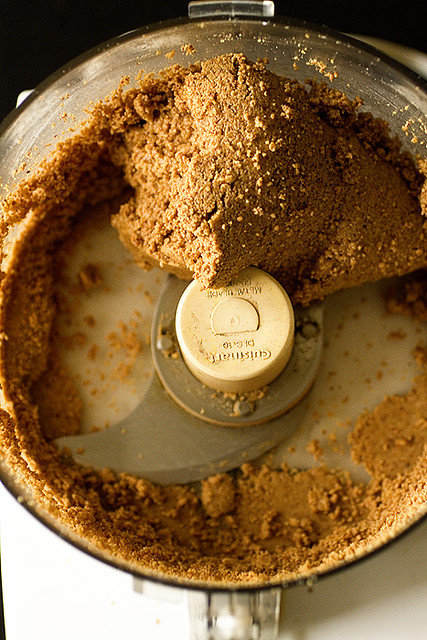
Grind, grind and grind some more. The mixture will take on the consistency of peanut butter. When it looks like this, keep grinding a bit longer.

101511AB-173


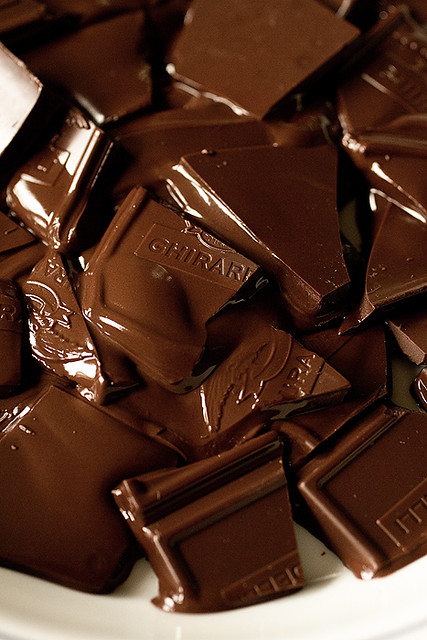
Break up a 4 oz. chocolate bar into a microwave safe bowl, and heat on high for 1 minute.

101511AB-148


When you take it out of the microwave, it will look like this...

101511AB-149


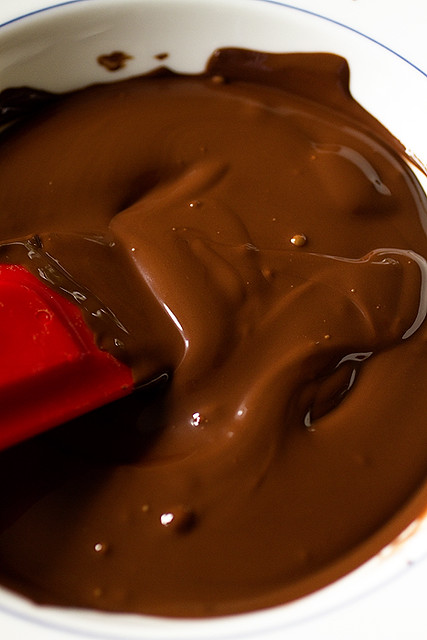
Give it a stir, and put it back in for another 30 seconds if necessary. Stir. If you don’t have any unmelted chunks... Voila! You have perfectly tempered chocolate.

101511AB-157


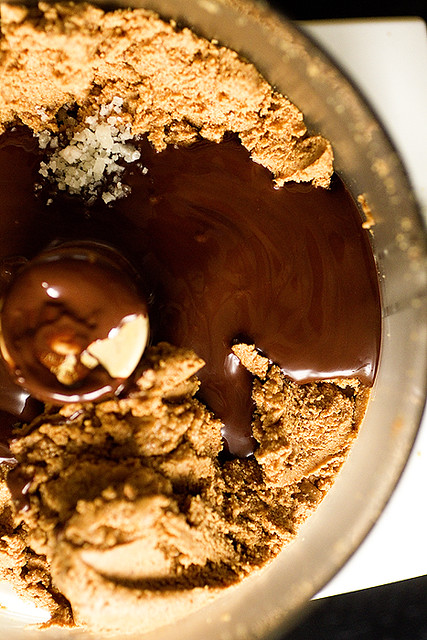
Add the melted chocolate, 1/4 teaspoon sea salt, and 1/2 teaspoon vanilla to the almond mixture and blend well.

101511AB-186


Pour it into jars and place in the refrigerator to firm it up.

101611AB-102


The butter will spread easier if you bring it to room temperature before serving.

101611AB-111


Dark Chocolate Almond Butter
PRINTABLE RECIPE

Ingredients

2 cups raw almonds or hazelnuts
4 ounces dark (or milk) chocolate
1 teaspoon coconut oil (this can be found near the olive oils at many grocery stores)
1/4-1/2 teaspoon course sea salt (fleur de sel)
1/2 teaspoon pure vanilla

Directions

Roast the raw nuts by placing them on a cookie sheet and baking them in a 350 degree oven for 10-15 minutes. Stir occasionally to keep them from burning.

Place the warm nuts and the coconut oil into a food processor and grind them until they’re as fine as possible. Then grind them some more. When you will see the texture change from crumbly to buttery (after about 5 minutes) you’re almost there.

Place the chocolate bar into a microwave safe dish and heat on high for 1 minute. It won’t look melted when you take it out, but stir it and watch the magic. Put it back in for another 30 seconds until it’s smooth. Add the melted chocolate, sea salt and vanilla to the nut mixture and blend until smooth. There will be small pieces of the nuts visible.

Pour into small glass jars. The consistency will be fairly thin at this point, but after a few hours in the refrigerator it will thicken. Bring it back to room temperature for perfect speadability.

Enjoy!