Tuesday, March 26, 2013

Soup's On!


22413BT-122

Last week I was ready to fire up the barbecue, raise the shade umbrella, clean the layer of green scum from the outdoor furniture, and let the outdoor dining season begin. The month of March has fooled me before, and this Portland spring was no exception. Rain, along with cold temperatures, returned as quickly as they had briefly departed. 

Because the soup days of winter are not yet over, I want to share one of my favorite soups with you, my dear readers. This is the kind of soup that can easily be thrown together without much effort. You may already have many of its necessary ingredients on hand.

22413BT-146


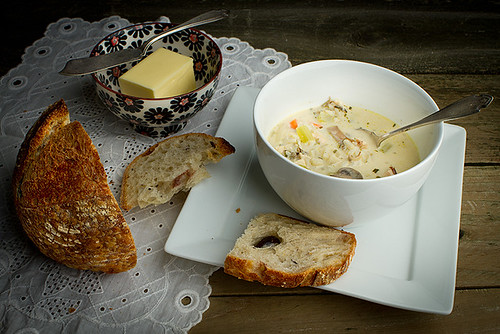
Chicken and Wild Rice Soup


INGREDIENTS:
(6-ounce) box long-grain and wild rice mix (such as Uncle Ben's) 
1 tablespoon olive oil
1 1/2 cups chopped red onion 
1 cup chopped celery
1 cup chopped carrot 
garlic cloves, chopped 
(8-ounce) package mushrooms, halved 
1/4 cup all-purpose flour
1/2 teaspoon dried tarragon
1/4 teaspoon dried thyme
2 cups water
2 tablespoons dry sherry
(15.75-ounce) cans fat-free, less-sodium chicken broth
(12-ounce) can fat-free evaporated milk
3 cups shredded roasted skinless chicken

DIRECTIONS:

• Prepare rice according to package directions; set aside. Roast 2-3 large chicken breasts; shred and chill.

• In a large Dutch oven, heat 1 tablespoon of olive oil over medium-high heat. Add chopped onion and next 4 ingredients (onion through mushrooms), and sauté for 6 minutes, or until the onion is tender. Lightly spoon the flour into a dry measuring cup, and level with a knife. Stir the flour, tarragon, and thyme into the onion mixture, and cook for 1 minute, stirring frequently. Add 2 cups of water, sherry, broth, and evaporated milk; bring mixture to a boil. Reduce heat, and simmer for 20 minutes or until slightly thick. Stir in cooked rice and chicken; cook for 10 minutes or until thoroughly heated. Great with a loaf of warm, buttered artisan bread for dipping.

Sunday, March 17, 2013

Why would I want to eat kale?

21413FP-145

Before 2012, I may have seen this leafy vegetable, probably even taken a bite of it. I don’t recall. It must not have left an impression.

I read recently where kale was being roasted and eaten as a snack. Kale chips. The crunch of potato chips without the fat and grease? Okay. The minute I tried this crispy, crunchy form of kale, I was hooked!

There are several varieties of kale, each full of nutritional value and gobs of fiber. The only one my local grocery stores stock is curly kale. Curly kale has ruffly leaves and a slightly pungent, peppery flavor.

According to AliveRaw.com, researchers have discovered that kale is rich in calcium, lutein, iron, beta-carotene, and vitamins A, C, and K. One serving of kale provides 192 percent of the recommended daily amount of vitamin A, which acts as a preventative against lung diseases. Kale’s abundance of phytochemicals is what bumps it up to a superfood. Phytochemicals are substances associated with the prevention of cancer, diabetes, cardiovascular disease, and hypertension. Phytochemicals are believed to help prevent cell damage, prevent cancer cell replication, and decrease cholesterol levels.

To think I was just trying to get more vegetables into my daughter’s tummy. By the way, she can eat an entire bunch of roasted kale in one sitting.

21413FP-147

21413FP-157

If there’s any left, I add it to soups...

21413FP-165

Or throw some raw kale into our morning smoothies...

31513SL-117

Roasted Kale
PRINTABLE RECIPE

2 bunches kale
2 Tablespoons good olive oil
2 large cloves garlic, minced
Sea salt and freshly ground pepper

Preheat your oven to 375°F. Rinse the kale and pat it dry thoroughly. Remove and discard the thick ribs and roughly chop or break up the leaves a bit. Pat leaves dry again. In a large bowl, toss with olive oil, garlic, sea salt and pepper. Spread out onto a large rimmed baking sheet. The kale leaves do not need to be in a single layer, they shrink in volume as they bake. Bake for 15-20 minutes, giving them a stir every five minutes or so, until its tender, crisp on the edges and slightly browned.

Pour votre santé!


Saturday, March 16, 2013

St Patrick's Day Dinner

My daughter is a vegetarian, my husband is eating low carb and high fiber, and I’m trying to keep everyone fed, which creates challenges both at the grocery store and in the kitchen. Regardless, I’ll be slow roasting a chunk of corned beef tomorrow. It’s a tradition I look forward to.

If you missed last year’s post on corned beef, you can find it here. In that post, I educate you on what type of meat to purchase that will provide the most flavorful, nutritious option. I was clueless as to why the cuts of beef differed so dramatically, so I needed to do some research. What I found rocked my world! Check out last year’s post before you’re disappointed by mediocre, unnaturally colored, stringy corned beef.

However you choose to celebrate St. Paddy’s Day (or not), I highly recommend this soda bread from one of Portland’s local bakeries, Grand Central Bakery, I’ve included that recipe here too. With a hint of sweetness, an amazingly moist crumb, and subtle flavors of orange and caraway, this bread is the perfect accompaniment to just about anything.

31711ID-104

31711ID-143

For instance, it’s really good with this...

31711ID-130


Sláinte!

Lá Fhéile Pádraig Sona Duit!

Thursday, March 7, 2013

Fresh Fruit Tarts with Pastry Cream

22313BT2-137-Edit
I guess you could call these tartlets, if you must.

Note to self: when baking pie, tarts or tartlets, make sure your house will be filled with friends and/or family who will actually help eat your creations.

Weekday dinners at our house generally consist of light fare lately... salads, soups, brown rice with sauteed veggies, fish. Pasta, bread, and desserts have loosely become weekend foods. I do mean ‘loosely,’ since sometime around Wednesday I start to crave a good juicy burger. Midweek also happens to be when cooking nightly dinners has worn thin and I want someone else to cook and do the dishes.

It’s hard to believe two weeks already passed since I created these. Fortunately, they freeze really well, so we were able to enjoy them for a few weekends. I want to share these little tarts so you too can experience their amazingness. Holy cow they’re incredible!

Unlike a pie shell, a tart’s shell texture is more like a shortbread cookie. It has to be sturdy enough to cradle its contents without crumbling.

I want to apologize right now for all the eggs you will need to make these. Oh, and you’ll also be needing cream and butter. Splurge on the best ingredients you can. Trust me, you won’t be sorry.

22313BT-113-Edit


You can make the shells days in advance of the custard filling. I like desserts that allow me to do things in steps so they seem much less time consuming. The custard can also sit covered in the fridge for a day or so. Just add the freshly washed fruit and whatever other toppings float your boat just before serving.

22313BT-240

I used three kinds of berries... blueberries, raspberries, strawberries.

22313BT2-118

22413BT-294

22413BT-266

Fresh Fruit Tarts with Pastry Cream
PRINTABLE RECIPE
Makes ten 3 1/2 inch or two 7-inch tarts

(a slightly modified recipe from Miette pastry shop in San Francisco)

Pastry Shells:
3 1/3 cups all-purpose flour
1/4 cup sugar
1/2 teaspoon salt
1 cup cold unsalted butter, cubed
2 large egg yolks
6-8 Tablespoons heavy cream
1. Combine the flour, sugar and salt in the bowl of a stand mixer. Mix on low speed for 30 seconds using your paddle attachment. Add the cubed butter and beat until the mixture is as fine as cornmeal (about 5 minutes).

2. In a separate bowl, whisk together the egg yolks and 2 tablespoons of the cream. Add this to the flour mixture in the mixer bowl and mix it all until just combined. Add more cream 1 tablespoon at a time until the dough comes together into large chunks. Gather the dough into a ball, pat it into a disk and wrap it tightly in plastic wrap. Refrigerate for at least 30 minutes.

3. Divide the dough to make the portions you need and pat gently into disks. Roll out each dough disk on a lightly floured surface to about 1/4 inch thick and 1 inch larger in diameter than the pans you’re using. Drape the rolled-out dough into the tart pans, gently pushing it into the bottom edges and against the pan sides to make a strong, straight shell. Trim the edges flush with the top rim of the pans. Prick all over the bottom with a fork and place them in the freezer for 30 minutes.

4. Preheat the oven to 350°F. Bake the shells for 20-25 minutes or until golden brown. Cool in the pan, remove and cool completely on a wire rack before filling.


Pastry Cream:
2 cups whole milk
1/2 vanilla bean
7 large egg yolks
1/2 cup sugar
2 Tablespoons cornstarch
2 Tablespoons unsalted butter, room temperature

1. Pour the milk into a medium saucepan. Use a sharp knife to slit the vanilla bean lengthwise and scrape the seeds into the milk. Throw in the pod. Heat until almost boiling (bubbles will begin to form at the edges). Remove from heat, cover and let steep for 1 hour.

2. In a medium bowl, whisk together the egg yolks, sugar and cornstarch until smooth. Set the bowl on a kitchen towel or nonskid surface and whisk the egg mixture while pouring about 1/2 cup of the hot milk into the mixture to temper. Gradually pour in the rest of the milk, whisking constantly. Pour the contents of the bowl into the pan and turn the heat to medium-low.

3. Cook, whisking constantly until the mixture thickens and comes to a slow boil, about 2 minutes. Immediately strain the cream through a fine-mesh sieve into a clean container. Discard the vanilla bean. Let the pastry cream cool to room temperature, for about 10 minutes, then whisk in the butter until it’s completely incorporated.

4. Cover the pastry cream with plastic wrap, pressing the plastic wrap directly onto the surface of the cream to prevent a skin from forming. Refrigerate until well chilled, at least 1 hour and up to 3 days.

Final assembly: Divide the chilled custard among the shells evenly. Top with blueberries, raspberries, strawberries, or your favorite fruit. Make sure to wash the fruit just before placing it onto the cream filling so that it stays firm and fresh.


Tuesday, February 19, 2013

Blueberry Pie

2913B2-133

It seems a bit early here in the Northwest to be making berry pies, but blueberries are showing up at my local grocery stores and I couldn’t help myself. Not only is blueberry pie delicious, it’s healthy (except for the butter, shortening, and whipped cream parts), and blueberries are the easiest berries to bake with. No peeling. No slicing. No seed removal.

21113BP-112

Aside from using fresh, sweet berries, here are a couple tips to creating the perfect blueberry pie: do not over bake it; and keep the berries slightly firm by freezing them first. Don’t completely thaw them before you place them in the pie shell. I don’t mean you should leave them as frozen as the ones shown below. You can thaw them to perfection by running some cold water over them for a minute or two. I prefer that the berries still have a bit of tooth after the pie is baked, but if you don’t, then go ahead and skip the freezing part. See the little nubbly fruit pieces peaking out? Whole berries wrapped in a buttery, flaky crust. That’s the way, uh huh uh huh, I like it, uh huh uh huh.

13113BB-119

My go-to blueberry pie recipe is very uncomplicated, as it should be.


Blueberry Pie
PRINTABLE RECIPE
Freeze 4 cups fresh blueberries overnight. Rinse the frozen berries in a colander by running cold water over them until they are slightly, but not completely, thawed. In a large bowl, mix 1/3 cup all-purpose flour, 3/4 cup granulated sugar, 1 teaspoon cinnamon. Mix well. Pour contents into a 9" prepared crust. Dot with 2 Tablespoons unsalted butter and 1 Tablespoon fresh lemon juice. Place a top crust over the filling, and cut slits in the top of the dough. Crimp the edges together. Brush the top with a beaten egg white and sprinkle with 1 Tablespoon granulated sugar. Place into a preheated 425°F. oven for 35-40 minutes, or until juices begin to bubble through slits. Remove and place on a wire rack until cooled. Serve room temperature with ice cream or a dollop of whipped cream on top.


Thursday, February 14, 2013

Doggie treats

 I made these heart cookies for my 4-legged children. They love them!

21413FP-187

21413FP-189

122512C-265

Here’s how you can make them too...


Yummy Doggie Treats
Melt together: 3 generous Tablespoons bacon grease, 2 generous Tablespoons peanut butter. Add 1 cup cornmeal, 2 cups all-purpose flour, 1 teaspoon of salt, 1 egg, 3/4 cup chicken broth. Mix well until it forms a dough.

Gather dough together and roll out to the thickness you want. Cut out shapes with cookie cutters. Bake at 400°F. for about 18-20 minutes. 


21413FP-209

Happy Valentine’s Day!

Monday, February 4, 2013

Zentangling

This post was written just after Thanksgiving 2012, but I just realized I failed to publish it. I figure the cold, dreary months of winter are here a while longer, so it’s still a good time to share this with you...

The word Zentangle meant nothing to me until a few weeks ago. While visiting my MIL on Thanksgiving (she hosted and cooked a fabulous meal), she shared this new-to-me art form she’s playing around with. I was intrigued. That night I was Zentangling in my dreams. In spite of the fact that the next morning was Black Friday, I knew a search for Zentangling materials was necessary. I found pens and some decent paper at my local art store, got 20% off, and two free t-shirts to boot... I was excited. I’d never participated in Black Friday before.

So what is Zentangling you ask? It’s often referred to as yoga for your brain. It’s a meditation achieved by drawing complicated looking patterns one line at a time. Simple patterns are combined in an unplanned way that grows and changes as you draw. With your mind engaged in drawing, your body can relax. Anxiety and stress melt away. Zentangle, the noun, was created by Rick Roberts and Maria Thomas. You can read more and order materials at their website here.

112612-123

To begin Zentangling, you won’t need much.

Here are the few items I purchased:

Pigma Micron Archival Ink Pens in various sizes: 2-01, 1-03, 1-05 (black)
Prismacolor Brush Tip Marker: size B (black)
Pencils (I had a case full of graphite pencils, but any pencils will do)
Strathmore small sketch pads (fine tooth surface)
Strathmore Bristol (smooth surface)

These materials got my daughter and I started, but pro tanglers recommend working on paper tiles made of 100% cotton, a heavy-weight fine artist’s paper with a beautiful vellum surface finish. My local art store didn’t carry these, so I compromised. The deckled-edge tiles are tempting me now though, and I’ll be ordering some as soon as possible. You can order Zentangle tiles here.

112612-116

112612-108

112612-103

If you do a Google search for Zentangle or Tangling you’ll hit on a multitude of information, how-to’s, patterns, books, etc.

Happy tangling!